Lane
-
Posts
1,042 -
Joined
-
Last visited
Content Type
Profiles
Forums
Downloads
Gallery
Store
Everything posted by Lane
-
To be frank; I would certainly be laughing if this were another state. Unfortunately; it's just an embarrassment to live in the same state as some of these bill sponsors. I went to a few gun stores today, and overheard some of a phone conversations about "our future" here in NY. The employees were instructed not to give legal advice on the phone; but clearly things like muzzleloading rifles being banned, and how future licensing is going to work were popular concerns. I've also NEVER seen these stores so flush with guns.... Almost every rack was full; overflowing even. There were dozens of guns laying on the counters, and parts of the shop even blocked of with more stacks of new-in-box items. Demand is through the roof (not surprising). It's almost like the Dems want to sell more guns?? Even plate carriers were hanging up for sale which is unusual for these shops.... I had a conversation about this with one of the old timers that hunts on the mountain here. This man is in his 80s now (though he doesn't look like it). Despite being a member of a rod and gun club, and rather politically aware; he had absolutely no idea that the definition of a firearm in NY was changing. There was almost no local reporting on the majority of the bills that just passed. A lot like the SAFE Act; this got rammed through the legislature without much warning. Took the time to scrub through the NY state senate hearings (the nearly 9-1/2 hour session) and mark off the starting times for the most jarring discussions. While they are the same video, when you click play; each one starts at a different bill as annotated. In short; the public displays of ignorance from bill sponsors and supporters was off the charts. It's just so "strange" how representative from downstate (NYC area) are so uninformed, and yet act confident and steadfast in layering on the stupidity. I was impressed with a few of the Senators from western NY for grilling sponsors about real issues; but even confronted directly about problems, there was absolutely zero appetite to delay passage of the bills to fix said issues. For those that don't want to watch much legislative nonsense; I left one of my favorite bits as the first video location (part of the semi-automatic licensing discussion) Senator Thomas asking, "What is a 22"? S9456: Definition of firearm S9458: License for semi-automatic rifles S4116A: Microstamping S9407B: Body Armor This last video is regarding NYSRPA v. Bruen. Hochul plans to have a response within HOURS of the supreme court decision about New York residents potentially gaining the ability to obtain and carry pistols without the current arbitrary may issue licensing scheme. She is already on record saying she has no problem passing unconstitutional laws, simply to let them get fought out in court at a later date. If only there were some kind of system in place to punish lawmakers and elected officials who purposely author and sign bills they know to be unconstitutional. There's simply no accountability; and that's not just a NY state thing.
-
Apparently they "found out" about the loopholes already; and are hoping/planning to ban all types of body armor in the future (plates and plate carriers). If the current law bans "7 layers of fabric"; am I in jeopardy if I wear layers of winter clothing? Or seven T-shirts?
-
I wish it was only that law that was passed... And yes; you're still allowed to buy plates and plate carriers. Body armor in NY state is defined as having 7 or more layers of fabric. Neither plates, nor plate carriers qualify as body armor; even after they passed a new law (body armor was already illegal to wear during the commission of a crime). There was a package of 10 bills, all signed at the same time; and rammed through the state legislature. I took the time to watch the actual proceedings and it was disturbing to say the least. The whole video is almost 9-1/2 hours long. The relevant parts are during the middle of the Controversial Calendar. I had to scrub around to find them all. Below is a link to the Press Release, and relevant bill explanations pasted below that. The two that stuck out to me as the very worst are S.9456/A.10504 An act to amend the penal law, in relation to defining firearm and S.9458/A.10503 Bars Purchase of Semiautomatic Rifles by Anyone Under Age 21 by Requiring a License. The changes to definition of "firearm" now would outlaw muzzle loading rifles, flare guns, and even power nailers that use RAMSET and the like (since licenses will not be issued for anything in the new firearm category). Furthermore, State Senator Luis Sepúlveda who sponsored the bill said, "I am honored Governor Kathy Hochul has signed into law my bill S9456, which changes the definition of firearms to include "Ghost Guns". Ghost Guns are, unequivocally, a big component of the increasing gun violence that is plaguing our communities.." This bill never had anything to do with Ghost Guns... We already have other laws that cover both unfinished and unserialized frames and receivers. He doesn't even understand what the intent of the bill was; and that is even more clear during the debates on the bill. Requiring a license to purchase semi-automatics applies to everyone; it's not simply raising the age. It also requires the full process of the existing pistol permitting requirements. In short; time consuming and expensive process. That also means future semi-automatic rifle purchases will also become "may issue" in the state of NY. If the current pistol permitting timeline applies; those licenses may take more than a year to obtain depending on which county a resident applies from. https://www.nysenate.gov/newsroom/press-releases/brian-kavanagh/governor-hochul-signs-landmark-legislative-package-strengthen Raising the Age to Purchase Semiautomatic Rifles Legislation S.9458/A.10503 requires individuals to obtain a license prior to purchasing a semiautomatic rifle. Under preexisting New York State law, individuals must be 21 years or older to acquire a gun license. Banning Body Armor Legislation S.9407-B/A.10497 makes it illegal to purchase and sell body vests for anyone who is not engaged in an eligible profession. Eligible professions include law enforcement officers and other professions, which will be designated by the Department of State in consultation with other agencies. It also requires that all body vest sales are completed in-person. Strengthening the Red Flag Law Legislation S.9113-A/A.10502 expands who may file an Extreme Risk Protection Order (ERPO) petition to include health care practitioners who have examined an individual within the last six months. It amends the firearm licensing statute to ensure that mental health practitioners' reports on potentially harmful individuals are considered closely when determining whether to issue a firearm license. It also requires police and district attorneys to file ERPO petitions when they have acquired credible information that an individual is likely to engage in conduct that would result in serious harm—either to themselves or others. It requires State Police and the Municipal Police Training Council to create and disseminate policies and procedures to identify when an ERPO petition may be warranted. Microstamping Legislation S.4116-A/A.7926-A requires the Division of Criminal Justice Services to certify or decline to certify that microstamping-enabled pistols are technologically viable and if certified as viable, to establish programs and processes for the implementation of such technology; and establishes the crime of the unlawful sale of a non-microstamping-enabled firearm. Microstamping is an innovative ammunition-marking technique that marks bullets and cartridge cases with a unique fingerprint each time a firearm is discharged. This allows investigators to link bullets and casings recovered at crime scenes to a specific gun and potentially other crimes. Closing Loopholes Legislation S.9456/A.10504 expands the definition of a "firearm" to include any weapon not defined in the Penal Law that is designed or may readily be converted to expel a projectile by action of an explosive. This is intended to capture firearms that have been modified to be shot from an arm brace, which are evading our current definitions of firearms and rifles. Legislation S.9229-A/A.10428-A eliminates the grandfathering of large capacity ammunition feeding devices that were lawfully possessed prior to the enactment of the Safe Act or manufactured prior to 1994. Legislation S.89-B/A.6716-A creates the crimes of making a threat of mass harm and aggravated making a threat of mass harm. Enhancing Information Sharing Legislation S.4970-A/A.1023-A requires enhanced reporting by law enforcement to the state and federal gun databases. Agencies must report seized or recovered guns to the criminal gun clearinghouse; participate in the ATF's collective data sharing program; and enter the make, model, caliber, and serial number of the gun into the national crime information center. The law also requires gun dealers to enact uniform security and reporting standards. It prohibits those under 18 and not accompanied by a parent from entering certain locations of a gun dealer's premises and requires training for all employees on conducting firearm, rifle, and shotgun transfers, including identification of and response to illegal purchases. It also requires State Police to conduct inspections of gun dealers every three years. Improving Response and Reporting of Hateful and Threatening Social Media Content Legislation S.4511-A/A.7865-A requires social media networks in New York to provide a clear and concise policy regarding how they would respond to incidents of hateful conduct on their platform and maintain easily accessible mechanisms for reporting hateful conduct on those platforms Legislation S.9465/A.10501 creates a new Task Force on Social Media and Violent Extremism. Housed in the Office of the Attorney General, the Task Force will study and investigate the role of social media companies in promoting and facilitating violent extremism and domestic terrorism online. This robust set of new laws, designed to provide immediate enhanced protections and developed and approved in partnership with Majority Leader Andrea Stewart-Cousins and Speaker Carl Heastie, builds on two Executive Orders issued in the immediate wake of the Buffalo shooting.
-
It's a lot crazier than that actually. A GB is 1024 megabytes. So that's 204.8 of those 5 MB hard drives per GB. Multiplied times 32 to meet the size of storage in the 32 GB phone; and that is 6,553.6; might as well round up to the next full hard drive at 6,554. A semi trailer can hold 26 pallets. So that's 252.07 semi trucks with 26 hard drives in the trailer of each one. Or; I guess a decently long train.
-
Hard to see in these images (use your imagination; the fins are in the tail); but a fin stabilized projectile could work well in a smooth barrel, and spin. I've had my eye on this since I put this project away the last time. A laser could easily make these directly; without the hassle of casting from 3d printed objects. Though; casting from 3d prints is fine just the same. Nothing to lose either way. I watched the video again for myself. And this is the thing that stuck out the most in terms of things that need to be "fixed".
-
Sad to knock up my thread that had 69 replies; but... There's a new demolition ranch video. I really should dig out the build that I've had stashed away for a while. Everything is here to finish it; but I haven't started playing Tetris with the parts yet. Interesting that they call out the bull-pup design a bit after 5:30 in the video. My build started out as a slight one-up of the GR1 specs. Nice to see that in action here. But I also never planned to fire 50 cal projectiles (or full auto)... The new ArcFlash Labs offering is only 22 Cal. The EMG-01B which run $1,350 - https://arcflashlabs.com/product/emg-01b/ I'll be back sometime soon with a real update. But I welcome any thoughts that come from watching this Demolition Ranch video; or whatever else comes to mind. I could use a little kick to get this going again... Lots of new tech in the shop here; which will come to light as I get moving again. Mostly; metal cutting with a laser, but a bunch of new test equipment too; which I hope helps keep me on the safer side of this project.
-
If you are willing to pay; Natchez has CCI BR2 Large Rifle primers in stock right now. Brownell's only has CCI small rifle magnum primers in stock. They come and go fairly quickly, and are limited in how many you can buy at once. https://www.natchezss.com/cci-standard-primers-br2-large-rifle.html I do see them in retail stores nearby from time to time as well. Usually broken down and sold in 100 counts lately. I found some 209 primers locally and paid $10 a sleeve for those.
-
I have a 5 round ASC magazine which has worked well for me. But I don't personally own a Gen3 PA-10. Primary Arms has those in stock: https://www.primaryarms.com/asc-308-magazine-5-round Another option is to use a 10 round Magpul PMAG, and get a limiter. More expensive option overall; but if you like PMAGs already, maybe that's better for you? I assume this is for hunting? https://www.cabelas.com/shop/en/magpul-308-minus-5-round-limiter
-
A bit long winded; and the video is out of sync with the audio. But good information about the legal fight that has been going on. It is not over yet...
-
I see the AmmoLand tag on the posted photo now. There are some basic blueprints posted around here. But even those that have been published, are all different. Some in small ways; and others in ways that could cause incompatibilities. Might help to see vaguely what you actually have in this case...
-
Are you sured that's a curved back, and not a slant (was it designed to be DPMS specifically)? I have not seen anyone post here about attempting to finish a forging. This should be interesting. You may have options. Certainly curious how your mag well turns out when you get to that point.
-
Different shapes.
-
Thanks for the update. Being a NY resident; I can't even talk about suppressed. What's the twist? You are hitting them point first?
-
Have to admit being curious about... A subsonic 300 Blackout load; into what barrel? How purpose built is this gun for 300 Blackout to 1,000 yards?
-
If you're going to leave a mark; I'm not sure that's the one I'd want. Still have to get the old pin out even if the bolt catch is off. In terms of leaving a mark. I bought a blemished polymer80 that had a defect that was visible in the finished product. I found JB Weld plastic bonder filled the void neatly, and I was even able to dye it the correct color when I was finished. I can't even find the seam after the fact. So assuming you don't do structural damage, you can alway fill in small imperfections.
-
I'd hope not to ruin an entire lower over such a small problem. First thing I would try is a lot of oil and see if you can work in the bolt catch, and make it move more freely. My polymer 80s have been a little tight (though I've not tried a 308 polymer 80; that scares me a bit). Assuming that does not work. My next move would be to drill out the front side, so it's no longer a blind pin hole. Punch the pin all the way through and out the other side (the freshly drilled hole). It's likely that the threaded type pin will still work afterwards assuming the threads didn't get mangled in the process. Obviously might be good to take a file to the inside of the channel for the bolt catch, and make sure it moves freely before installing the new pin. But yeah; you could also try to destroy just the bolt catch. That seem a bit more difficult; but maybe I'm not thinking of something that would make it easy. It's certainly a better option than buying another lower.
-
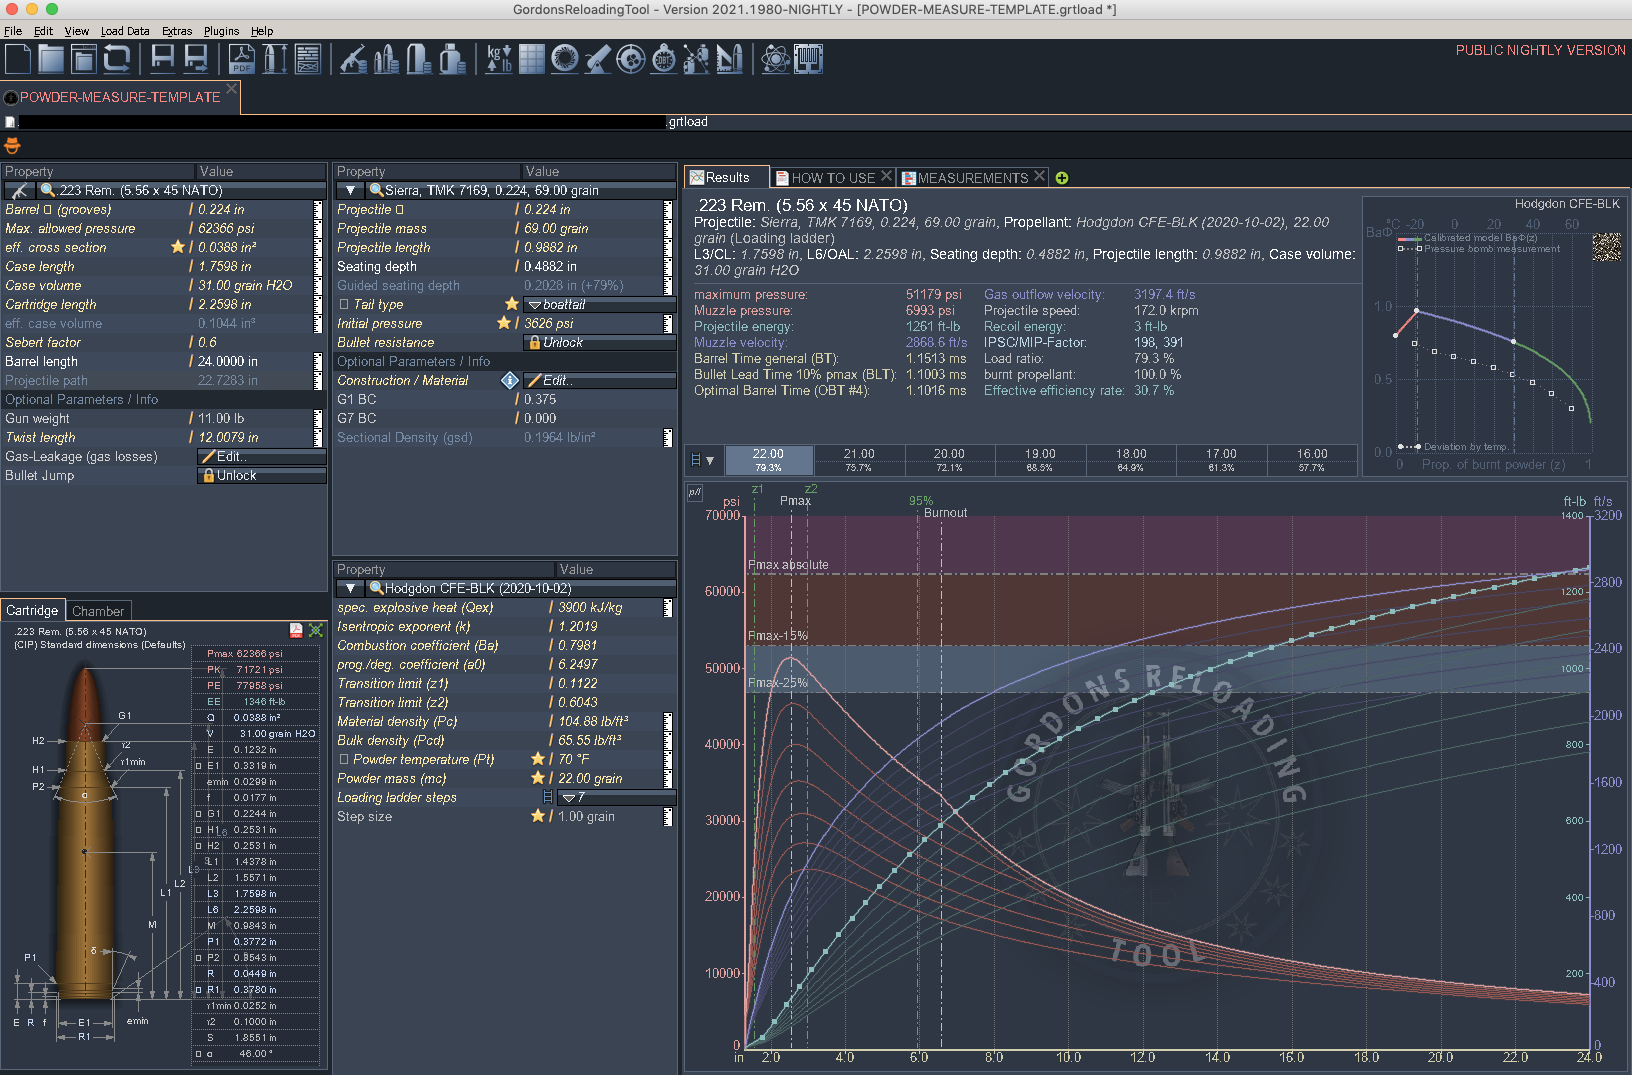
I have used QuickLOAD software on and off; but it was missing some powder choices for me early on. I never took it too seriously; but did model loads with odd powders when I was curious. It did offer me some useful insight when trying to make blanks for the can cannon. I found an alternative that appears to be reasonably well supported; and it's actually free. It has both Windows and Linux downloads available on the website; and I've even tested it to be fully functional (so far) running the Windows version on a Mac with WINE (which is also free). Gordon's Reloading Tool; or GRT. https://www.grtools.de I've seen quite a few positive anecdotes about GRT in other forums. I have personally yet to explore more than the basic features. But will absolutely be working up a few loads and comparing notes with the LabRadar and GRT software (and QuickLOAD where applicable). I'll post back when I have a better review/comparison myself; but figured I would throw it out here to see if anyone else has experience or opinions. Anyone that might have been on the fence about the $150 cost of QuickLOAD might care.
-
Food for thought. I'm not even close to being first with this kind of work.... https://www.snipershide.com/shooting/threads/homemade-induction-annealer.6966638/page-4 And that's page 4... I have quite a bit more reading to do myself to get back up to speed. But can reproduce almost all of that so far; and more soon. Frenchcreekvalley knows his stuff. Found him on some EE forums a while back; around the time he was doing this kind of testing.
-
Hey; I like book lernin. But I too was chomping at the bit for this outcome. Don't want to share even the least bit of experience of feedback? Can't answer basic questions? Who cares... Probably that person sitting next to me in school that needed to cheat on every exam. Fuuuoook off.
-
https://www.amazon.com/Solary-Magnetic-Induction-Automotive-Flameless/dp/B0851C6Q22/ This is only $180. But apparently comes with no case, and a lot less coils. Shouldn't I have one so I can compare and contrast induction drivers? I think so.
-
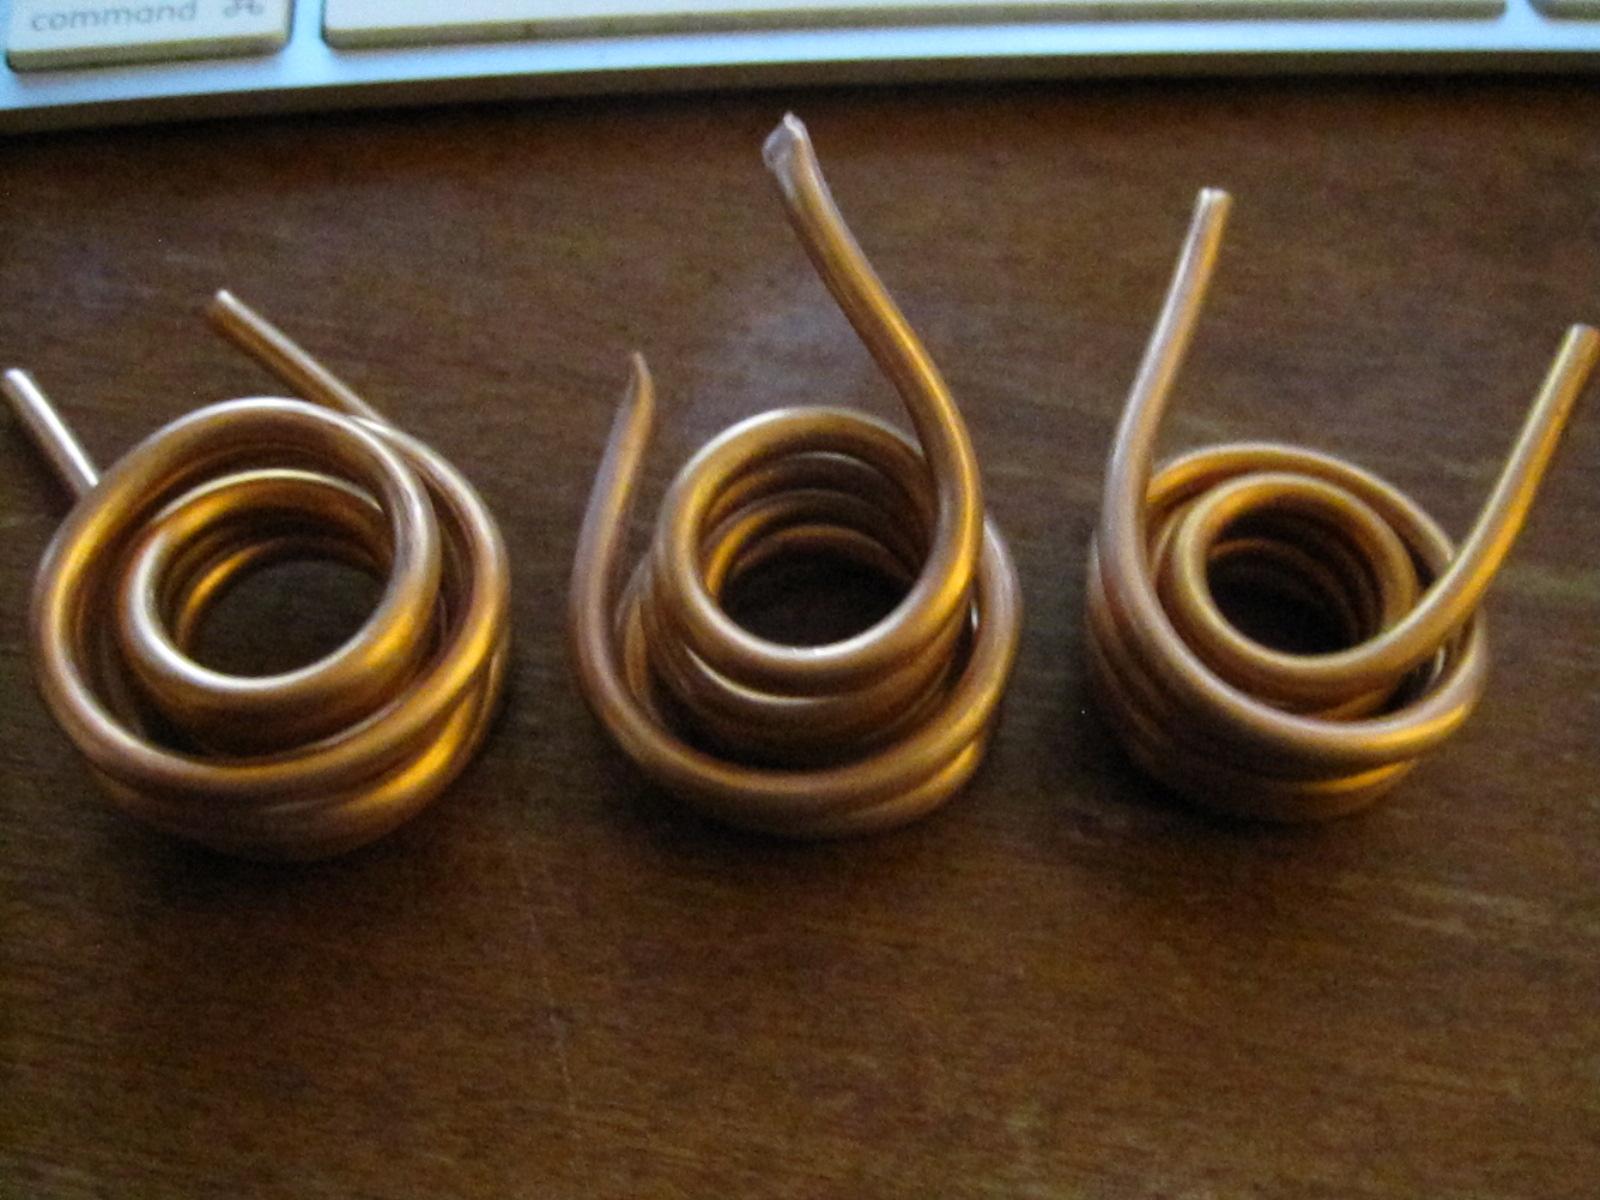
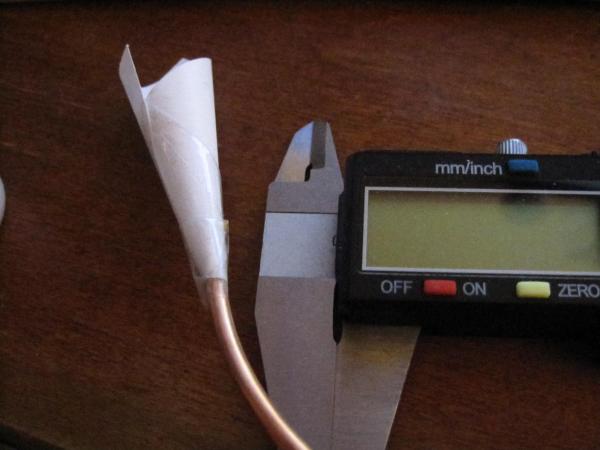
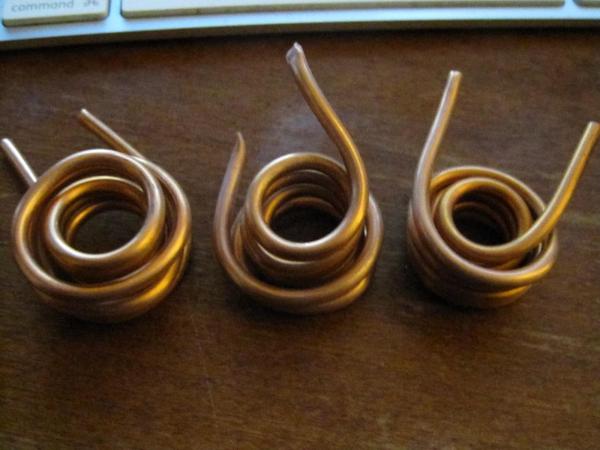
I am in exactly the same boat. For a while I had ignored annealing because I could get more brass without question. That ship has sailed though; at least in the short term. And if there's a really easy way to get this done; I'm game. Without too many boring details out of the gate; I'd like to apply a technique I use in another induction system. The multi-layer coil. It should focus the heat better; and apply more power to a small area. Even a pancake coil isn't out of the question. It's also possible to add I.D. to the top of the coil, which will still act as a turn, but apply less energy to the neck while still focusing on the shoulder. So there's a number of ways to riff off this design based on the results. Still on the fence about picking up the bolt warmer today; but that might change in the next few hours. I've already wound a few coils that should work with the induction driver board that's on my desk right now. Have a few more laying around; and all of those should work for case annealing as well. Even without water cooling; they should be plug compatible with the bolt warmer. At some point I'll probably solder wires so I can connect them electrically and with water cooling in both systems easily. Tried salt filling one of the 1/8" tubing coils; and it seemed like more trouble than it was worth. Not sure if it will help much, if at all with water flow rate. I didn't kink any of my cold bent coils yet. One thing I still need is some of that fiberglass sheathing. It would make coil winding a lot easier (so they don't touch electrically); and it helps with insulation when operating as well. Ordered 25' of tubing, so a roll of the fiberglass will be on the way sometime soon. I use Kaowool insulation in the other system; so I don't need the sheathe there. Images: Salt filling with a paper funnel. And one salt filled, and two cold bent 1/8" copper tubing dual layer coils. With a bit more practice and all that, this should be a shoe in. And likely even faster than what's shown in the video. Adding a second layer will reduce heating time significantly.
-
I am here to eat my own words in this topic. Stumbled across a video the other day. I'm not sure I will be sticking with propane after all... That's just me; but you can judge for yourself. While I'm not going that route exactly; it inspired me to pick up some 1/8" copper tubing (so it can be water cooled). Watching him use the handheld unit without even a water bath was promising enough. And; living in the cold northeast; a bolt warmer is a good buy for other reasons (rusty bolts on all types of motor vehicles). I don't want to say too much about my own build here. But the video is worth a watch no matter what.
-
Welcome from NY. Someone will be by shortly to give you some more advice here... This isn't something I've ever seen before. So I can only say; "glad to see you made it here to the 308ar.com forum"... This looks pretty interesting. While the weights appear to be kind of expensive; I'm actually curious about that JP VMOS BCG in some ways. All the best Sir!
-
High voltage probe showed up. I measured a whole bunch of stuff I had laying around that I wasn't fully up to speed with yet. One of the lithium powered electric flyswatters tops out at 4,700V on a full charge; it sags as the battery voltage drops down to around 3,500V before it cuts off the power. The other one like it only peaks at 4,000V (ordered a 2-pack) which might be due to a manufacturing defect (I have already opened it up and found a pinched battery cable; a wire resistor). Those are working just fine for charging capacitor banks to a reasonably high voltage for testing. Might need another pair; but that's really cheap at this point. And they kill bugs. No reason not to get a few more. The ignition modules in particular are going to need a bit more effort in that department. Those devices seem to start above 25kV. They "sing" and quickly start dropping in output voltage due to the resistance of the HV probe and probably wiring too; settling around 15kV. Still have another half dozen of them to test; and ideally try to get some handle on what the peak output voltage really is.... This is a big part of why I needed an HV probe; I knew the voltage was up there... I assume they can also be wired in series or parallel; but I haven't messed with that at all. Reality is they start WAY above even 40kV.... The only reason I see that low number is because of the resistance in the probe (and wires). I still need to get back into the math to design a few second stage coils. Since I already purchased a bunch of silicon switches (SCRs) to dump capacitors. I might as well work out those details. Early on I bought a bunch of 10mm gapped IR triggers to work with sight holes, or acrylic barrel sections. If I don't blow anything up in the process, I could have a seven stage secondary that can run independent of the arc triggered initial acceleration. While I'm thinking about it; I might as well dig into a CAD drawing of the major elements. I've already drawn some of the difficult components. So it's just a matter of fleshing out the new details. Coil size is relatively static at this point; and none of them will change much in length or thickness. Prototyping is hard. I got lost in the CAD drawing for a bit; and I'm still not back on track. Happens. Really should be using another 3D application once I make these parts.

-
That's quite a rundown... Someone has been reading about the possibilities. I have a few induction furnaces, and I've tested that method briefly for annealing. I'm personally in the propane torch camp though. It's easy to see; out in the open, and is much less complicated than the rest in my personal opinion. I haven't built one yet; but I've been eyeballing the basic two motor design for quite some time. The one that has a slow motor up top to grab a case from the stack, and then the "cake pan" to roll it before dropping in water. Setting up a torch and aiming it is really easy to do. Sure; you might be able to get more done per hour with an induction annealer. But that hardly matters; the whole point is having an automated system in the first place. One might consider shopping around for torch heads if propane is the go-to (one that can maintain a flame size over time). Either way. Even running batches of a 100 should be possible in even the worst of setups. What prototyping brings to the table is, an easy to way to figure out what DOES NOT work. Prototyping is rarely about anything else. Fine tuning can happen only once the design is solidified based on those previous bad experiences. You need some pretty small motors in general for the coffee can or bake pan setup. Taking apart kids toys is often a fine source for such things. This might also apply soon; when college schedules break for a semester; there are often many inkjet printers left on the curb for trash as students move out. Those are a great source for just the right kind of motors. One would be wise to grab an arduino and/or motor drivers from amazon or eBay or whatever too. But that's all it really takes. A sturdy cardboard box and a few fabricated parts are all that's left to worry about.