Lane
-
Posts
1,042 -
Joined
-
Last visited
Content Type
Profiles
Forums
Downloads
Gallery
Store
Everything posted by Lane
-
What do you have on order or in the mail? Part 2
Lane replied to imschur's topic in General Discussion
For sure. Was just messing around. You can buy fiber optic cameras and stuff that do crazy things. If he is already in your wallet; he might as well get some lab grade 4k cams. -
What do you have on order or in the mail? Part 2
Lane replied to imschur's topic in General Discussion
My Teslong will be here later today. I'll be sure to test the resolution. Was knocking the resolution of Belt Fed's other Standalone/Gun Type borescope. I bet the head it too big for a lot of things. And I'm not sure his pistol grip screen in 1080p? Curious to see.... (looked sketch in the images). Wouldn't be hard to find a 4k scope; but it might not fit in .22 caliber. -
What do you have on order or in the mail? Part 2
Lane replied to imschur's topic in General Discussion
No way. I think there are better options. I can't imagine that's a 1080p screen on the handheld. If you're going to get silly with the money; you might as well go 4k borescope.... And hook it to your 342" OLED TV. -
What do you have on order or in the mail? Part 2
Lane replied to imschur's topic in General Discussion
Curious as well; I'll certainly post images to compare the two. Might as well start a new thread just for that. -
What do you have on order or in the mail? Part 2
Lane replied to imschur's topic in General Discussion
I've been thinking the same thing. For $20 you can't go wrong! Just stick it in backwards if it's too short. Just ordered one; be here Monday... -
Lane's: jtallen83 inspired 21.750" 300 AAC Blackouts
Lane replied to Lane's topic in 300 AAC Blackout
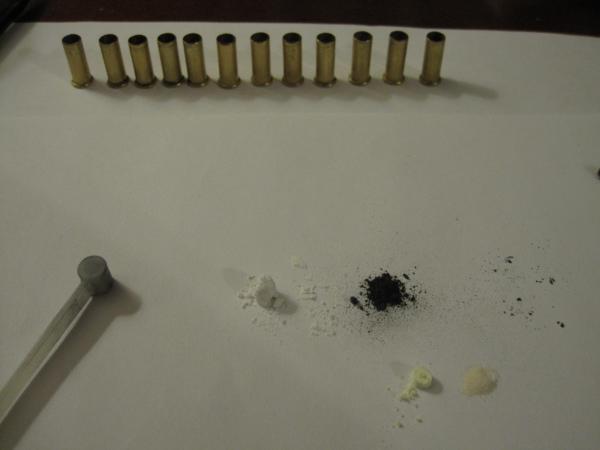
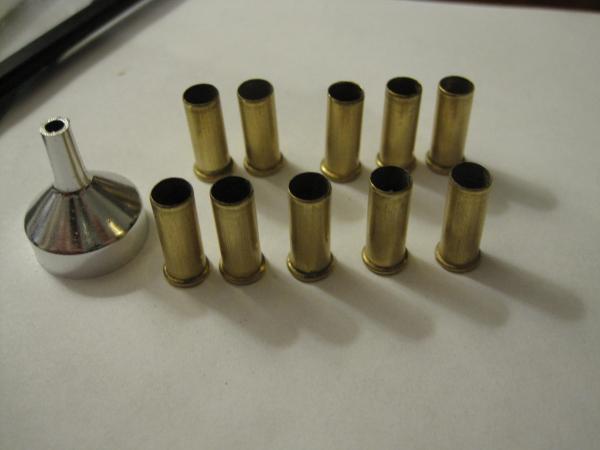
Got the new hardware in today. Need to find a better place to photograph them, probably full sunlight would help. I expected a hassle getting it setup with the shot timer software, and it was a cinch. I had it working in less than an hour with minor changes to my current source code. I spent the next few hours trying to clean up that code to seamlessly support multiple pieces of hardware with a single #define in the first few lines; simply uncomment the line for the board it is installing on. I do have a bit of backtracking to do for the older hardware's OLED screen drivers, but all of the display routines are already commented out in the main code blocks already; just a matter of encapsulating each display driver type and "switching" them on and off at compile time. Quite happy with the progress in a short period of time. The new hardware is just what I needed to get myself excited about finishing up. Didn't even realize the new one has a built in buzzer which completes the all-in-one no soldering, no add-ons development system. You can buy this thing on Amazon.com. All of these development hardware boxes can be easily transferred into slightly larger (probably maple) wood boxes, with larger batteries instead of the orangey-red plastics. I've already got a few scraps from a biathlon stock I was building over the winter, that are perfect in dimension. Should only take a few hours to mill out body pockets and make the covers for the handful of devices I have on hand already. Still have some tuning to do to support 3 different display resolutions. Much like the other hardware #defines, this needs to be addressed in a particular way. Font sized need to change, etc. But that's minor. Ideally the device can be used without the screen even being on. By default, you just push the Go button and it runs program 1. And I log into it over my WiFi to collect the data in a web browser with any kind of phone, tablet, or computer. Took the new hardware outside today and my audio input gain, shot ring time, and trigger threshold were all a bit wrong. it triggered 4-5 times for each .22lr round. But I'd say that's a good thing. I was just guessing on the configuration before taking it outside. And I was shooting with the timer near the end of the barrel, much like you do with a lab radar. Next time I got out, I need to start debugging whole course/drill programs in real life. I've been able to program then for a long time, just haven't been putting it to the test. Don't want to be too optimistic, but honing in on fully functional for complex courses of fire certainly... It can count shots audibly; and block you from starting the next stage without; so I need to be tight on those sound input parameters (as well as between guns, and between various types of shot timer hardware). Sorry for the trash image. But old and new shot timer and a box of .22lr. Notice the huge black border on the new screen. There's a lot more pixels to use (so larger font size needed); and should be easier to read as I get all those UI issues worked out with real world testing. (Obviously there's a lot of debug crap on the screens still). Sounds complicated I'm sure; and it is. But I've already got my dream shot timer, and it only gets better as I work out these minor details. Look forward to sharing functional units in real life sometime soon.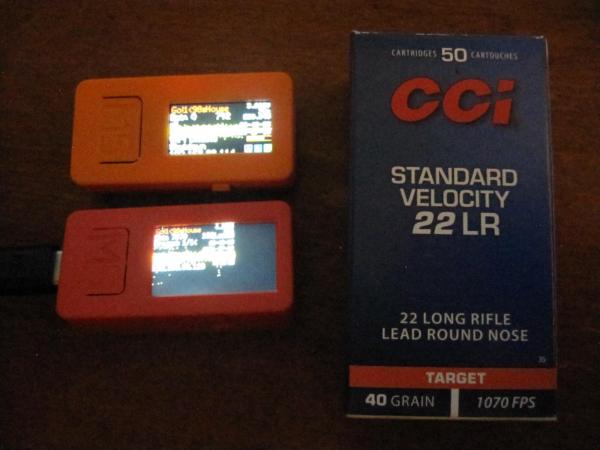
-
What do you have on order or in the mail? Part 2
Lane replied to imschur's topic in General Discussion
That's sad. I looked very closely at that option but didn't notice the coupon. I ended up ordering one of the Teslong borescopes like everyone else. The extra few inches (45" vs. 27") is what ultimately drove that decision considering the full price of the DEPSTECH model was only $5 less. Figured better to have the extra length and not need it than to need more length and not have it. Certainly would have been swayed by the $25 savings though too. Ordered myself the 45" borescope just a few hours before you posted. -
Lane's: jtallen83 inspired 21.750" 300 AAC Blackouts
Lane replied to Lane's topic in 300 AAC Blackout
Here to post again about a return to work on the shot timer, mostly because I want to start using it regularly myself... Now that ammo is starting be become available here and there. This post is largely for personal documentation; but there is a new piece of hardware available that should be ideal for this. It's the same size, same CPU, and has all the same peripherals; but contains a larger battery, and larger higher resolution screen (unfortunately that's a bit of extra work to utilize as I need to update every screen draw routine in software). I worried about that in particular; that some people might find the current model hardware's screen to be just a bit too small. Back to bug fixing. I had started redesigning the screen that runs during the shot timer action some time back; but never quite finished it. I've also noticed some oddities about flashing new hardware that I need to run to ground; mainly creating the internal files that store data and configurations. At this point I might just add another feature to backup all that data so I can keep everything, even when updating regularly, or testing new hardware. I have close to a dozen boards that can run some version of the shot timer software I wrote a few years back. Still have quite a bit of debug code running; but some time ago I had already run testing on sub-millisecond shot timing. Not sure what I did; but the shot timing display just started working... It had been broken since the last hardware upgrade due to screen size issues I had thought. Looks like I need to add a few more ISRs for button controls. One thing that piqued my interest earlier today was reading about a RCBS chargemaster with bluetooth. The hardware that runs the shot timer also supports bluetooth. It might be nice to have a phone app that can communicate that way. It could act much like the LabRadar app, which would allow it to download a copy of the data to live on the phone. It could also be used for remote control, or remote monitoring. This shot time device is so small; that I'm personally planning to attach it to my rifles when using it. Ultimately the goal is to also be able to use it for measuring barrel flex when shooting too, so there are reasons for that... But for the time being I plan to attach it to my handguard, or the front of the stock of a bolt action fun gun. It even has built in magnets, so it can swap from a simple mount on multiple guns with ease. Another advantage of the gun mount is that I can use visual triggering instead of audio. There is a bright red LED built into the case which can be used instead of the standard buzzer/tone type sound most shot timers I'm aware of utilize. Seems like a fine option to have; and one I plan to use. New larger screen hardware should be here in a day or two, so I can start testing with that. I think; if it weren't night time, I could go shoot with it right now and have all the functions I need for regular shot timing again; thanks to that mystery bug fix that just happened. Here's a look at the current hardware model with the red LED lit, and a penny next to it on my desk. It's really small! I'll post a comparison when the new model arrives with the bigger screen.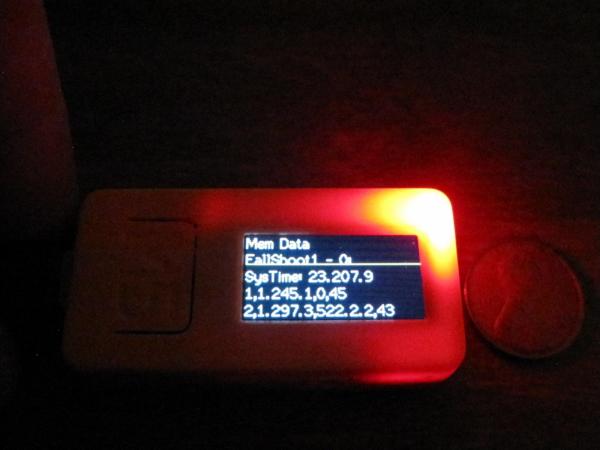
-
You tried really hard. But I have never, NOT EVER, NOT been able to remove a stuck case by rotating the lower die. Once you know you fuoooked it up;; you have to fix it. I'm super curious about what you're doing here.
-
Did you re-finish that thing or something? Too clean for 1,100 rounds? Or was that on day 1?
-
You're talking external ballistics, on an internal ballistics situation. A few minutes after I posted, I realized flight times were not right in that comparison. I didn't want to re-post to clarify. I think disconnecting the mag-length is a benefit. If you're shooting distance already; why do you need mag length limits? Is anyone in need of semi-auto deer or elk hunts?
-
That's kind of weird to me upon inspection. The fast pills wear out the barrel faster. But faster pills take on less external forces in flight. So the trade is almost 1:1. Consider a 2,000 fps pill hitting a target at 600 yards; and a 4,000 fps pill hitting that same target. One gets twice the time in flight to absorb wind; and all the other offensive forces along the way... Just buy a dozen fresh barrels for your favorite configurations? What about those seating depth questions? Mostly rhetorical questions... Should one just ignore the magazine (and associated length restrictions) if you want to nail that stuff with an AR build? I'm kind of thinking yes...
-
I'm going back and re-watching these just to make sure I didn't miss anything. I have come up with a few questions along the way though. If seating depth can be used to tune any load; isn't it ideal to be closer to the lands to avoid excessive throat erosion? I don't think Erik talks about that explicitly. Obviously; in some situations it's ideal to get the most speed (highest powder charge that finds a node), for supersonic stability at extreme distance... Is a short seating depth of any benefit (other than mag fit) in this situation? What causes excessive throat erosion in 6.5x284 Norma as Magwa mentioned? While it's not a foreign concept to me; I had personally assumed it was related to blow-by, from gasses escaping before the bullet hits the lands (or plugs the barrel). Or aggressive powder charges near the limits of a cartridge/powder load. Any thoughts on that matter? Is a chrome lined barrel something that would last longer? Or is that roughly an un-haggleable price you must pay for that performance?
-
Forty-five minutes. It's a long watch if you can even do it non-stop. But I
-
Have your buddy measure the round... That's a FUNNY problem. Your rounds, and your load, for your barrel, and that specific configuration; are for you... At the same time; everyone can have this kind of reliability with a bit of effort.
-
Ouch; video 2 is a re-hash? That's going to take me a bit longer. I was 100% solid with video #1. Those were some superior measurements, and numbers presented in the first video. I always wondered about actual round count to throat erosion data. I'll take his input as a solid metric. Nothing to fret over.
-
I'm still working on it. Watching the videos slowly to make sure I don't miss anything; and digest if fully. Same deal, I wouldn't even care about these nuances without a load work up. Again; super helpful. These videos are an excellent guardrail to prevent unfounded tangents in load development. Much appreciated.
-
Have not finished watching the first video yet; but this is quality stuff. He's a bit long winded, but it's well worth the time. Found out that I already adhere to a lot of this as a matter of course. Making a dummy round is always the first thing off my press for any projectile/cartridge combo (once I'm happy with everything else). Made extra long to find out where I stand... His method was a bit different than mine beyond that, I'll keep that in mind going forward. I do these tests in a more complicated way right now. But the; "you don't need to know where the lands are".... I don't think Magwa was saying he did need to know exactly. I thought his methodology was sound from the start. Getting close to the end of first video. Still agree with his math and methods 100%. I have a few builds with single digit round counts for this very reason. I want to be absolutely sure I'm not making unfounded assumptions. Thanks for this... Been a while since I had some quality inputs.
-
Took my time on the case prep for this; which is a delicate affair in comparison to larger brass. Mixed up a half batch of priming compound to the best of my ability; and loaded 10 cases. Five with acetone, and five with denatured alcohol. Ultimately I wasn't happy with 91% isopropyl alcohol for this. The denatured still takes considerably longer to evaporate, and packing the rim is more difficult as a result. One drop of acetone, and a short wait; made them pack pretty quickly in a noticeable way. Started testing a jig for centerfire primers, but it's not quite finished. It's a simple design, to hold large and small primer cups, and the anvil for each, so that priming compound can be pushed the recessed cups; and the anvil re-inserted. Reasonably confident in the results achieved; but will test them before making any more. It's really not that bad if you control your breath. A sneeze, or unsteady hand could make a mess real fast.

-
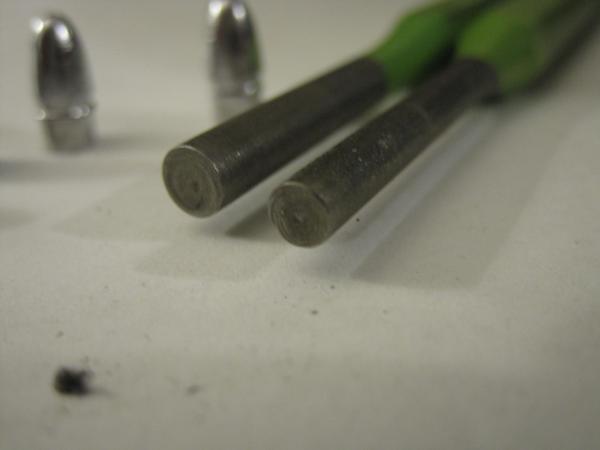
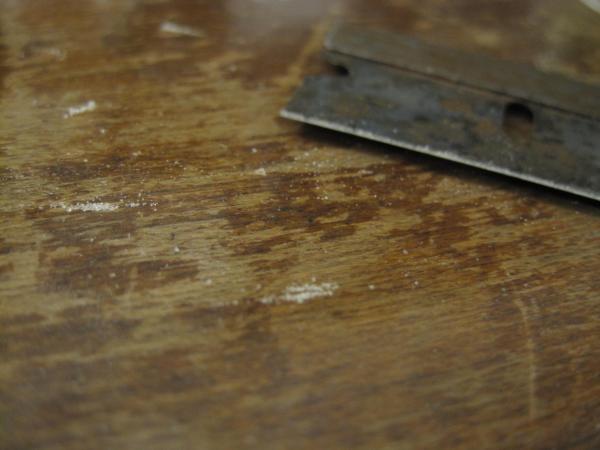
It appears I may had believed incorrect information about what this Prime All compound really is. It seems to actually be H-42; and not the H-48 I thought it was originally (and read other reviews guessing). That would certainly explain the odd weights of each bag in comparison to the H-48 recipe. The forth bag is apparently powdered shellac (not ground glass). Immediately the next test was to see what solvent works best for that. I'm happy with acetone, and think it works better than 91% isopropyl alcohol. Going to try denatured as well, if I can find some in the garage. Acetone evaporates extremely quickly though, so I'd be curious to see if anything is is better in practice. Probably prime a few cases with each option... Others have suggested adding even more shellac in liquid form. So I'll try that too. I cast a few projectiles, and while the mold works well; it has some quirks. Seems like it might even be designed for left handed users. Flung a few sprue cuts on the floor just trying to get the hang of it. And now double sure I need to make wooden handles for it. Even thick leather gloves weren't quite enough to keep my hands comfortable; as such, I only made a quick dozen. Ground down the tips of a couple cheap punches and then hammered out most of the dent in a few dozen spent rimfire cases. While still imperfect, they seem to be a lot better. Now the cases need some cleaning, and resizing. Then I'll start loading rimfire primers. I may make a few small rifle primers too; but I don't currently have a gun picked out to use for that purpose. Apparently baking soda can be added to make the primers last longer (less moisture sensitive), so I'll give that a try if I make centerfire in any quantity. I also wonder if a final application of dilute shellac would make that unnecessary; maybe after the anvil is pressed in? Images: Cheap punches before grinding, and .22lr castings. Tiny rails (floating on glass) of shellac powder before testing solvents.
-
Finally got the motivation to jump into this idea headfirst. Still not entirely committed to corrosive primers in most of my guns. But at this point; I figure it's little harm to dedicate a Savage Mark II to running corrosive loads... Certainly not able to buy a lot of new .22lr these days. The best guess I've seen about this particular priming compound, is that it is roughly H-48 compound... Ground glass, potassium chlorate, antimony sulfide, and sulphur. Certainly not a great price on the mix here; but I thought it would be interesting to try. Could apparently get something like 50x this for about $200 investment. (1 pound sulphur $4, 4 pounds potassium chlorate $80, 2 pounds antimony tri-sulfide $50 (should work), 1 pound ground glass (silicon) $20)=3628g). What I got was 26 grams PC, 18g AS, 14.8g Sulphur, and 5.5 grams ground glass (fine sand is what it looks like, for $20; which is only 65g total. Perhaps some will see this as fools errand; they may even be correct. My motives remain unchanged though; and I think this is a great project to explore extreme weight accuracy in powder measurement. One could even try to weigh out priming compound; though I'm not sure I'll be overly concerned with that up front. I will weigh out each of the measured portions though; to see what the mix "really" is. The measurements certainly don't line up exactly with H-48 compound. Initial inspection of the dual purpose .22lr casting/crimping tool, show it was CNC machined for the most part; and then hand adjusted with a file. There is still a bit of dust in the cavities from that; which needs to be cleaned out before smoking. It absolutely needs at least one; if not two wooden handles fabricated for it to be reasonably functional. Expensive for what it is, but I don't have a good way to make those projectile molds myself. Are they cut with a custom tool (sure doesn't look like ball end mill work)? I've already messed with jamming a Lee mold cast 55 grain into a .22lr case. Seems to mostly fit; but won't chamber in my test rifle. Resizing might be the ticket though; and I've already got equipment for that. No sense letting a good crisis to go to waste (might as well learn something "new" while it's tough to find ammo/reloading components)...

-
Are your anti gun politicians as stupid as mine?
Lane replied to Cunuckgaucho's topic in Firearm Industry News and Gossip
He even goes as far as calling them "assault rifle"; a term that has a real and specific definition. "noun: a rapid-fire, magazine-fed automatic rifle designed for infantry use." The short answer though; is "yes, they are all that stupid". Here are a few of my favorites: -
Nobody casting their own buckshot?
-
It was a sad day when Wal-Mart stopped selling brass 7.62x39... A few years later; it's noteworthy to find it for sale online. Target sports had some 12 gauge when I looked just a few minutes ago as well.
-
That's a 10" rail? Really dig that look; it's tight. Looks like you're strapping up for a bipod; or a flashlight (probably don't have to wonder in your case, given the cartridge for this build)?